


How to Use Azure IoT Hub, Azure function, and Azure Cosmos DB – Walk-through
IoT is very well-known throughout the corporate world. For starters, this isn’t another IoT article where we’re going to do home automation. This is a simple walk-through about adding a server-less back-end to your existing IoT system.
We’ll touch on how Azure IoT Hub will be used as an event hub or a messaging system for “Things.” Also, we’ll cover how these incoming messages can be routed to the related database using Azure functions.
No devices will be used. We’ll be simulating our PC as a device and use node.js to connect to IoT hub and stream data. Then, we’ll see how the streamed data to the IoT hub can be routed to the DB after some logic. Doing so, by using Azure functions and C#.
Finally, we’ll see how the integration happens where we connect every component to everything.
Architecture

Fig 1: Architecture basic
The above figure shows the basic architecture or flow of the system. It also should be noted that we’ll be using cosmos DB’s mongo DB API to access the database. This displays the flow of data from a device to the database using an architecture without a server.
Azure IoT hub
Azure IoT hub is essentially an IoT platform. Using this, we are going to send messages from our simulated device.
Technically, the device section of any IoT system is referred to as an edge device. From our simulated edge device, we are going to send data to the azure IoT hub using MQTT protocol.
First, let’s go over how to set the Azure IoT Hub. Head on to portal.azure.com and create a new IoT hub
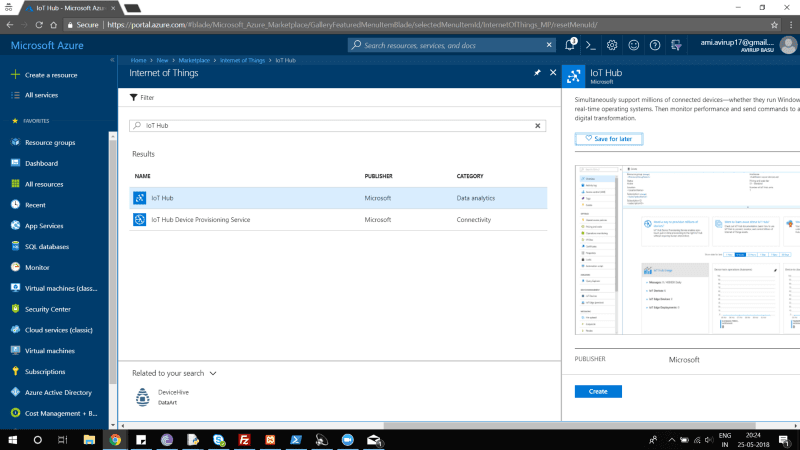
Fig2: Azure IoT Hub – Screenshot
Once created, we will add a new device and name it something relevant. In this case, the name of the IoT hub is “spektro” and the name of the device is “simulatedDevice”.
To create a device, click on the IoT hub you just created and head on to the “IoT devices”, under the tab “Explorers”.

Fig4: Screenshot — IoT Devices
After creating the device, the next step is to write a code that will simulate the device and send some exciting raw data. For the code, we will stick to node.js. Use the npm package manager for installing the module.
npm install azure-iot-device-mqtt
After a successful installation, we can use the above dependency. Another important parameter we need to note is the connection string. This will act as a key for our simulated device.
For this, click on the device ID you just created. In this case, it was “simulatedDevice”. Once you click that, you will end up in device details.
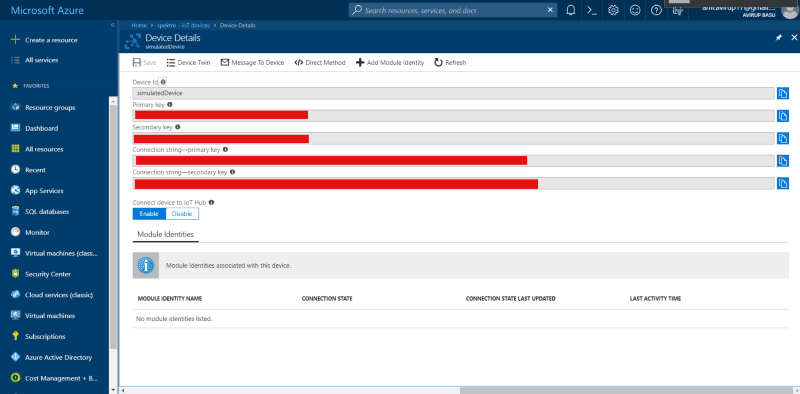
Fig5: Screenshot — Device Details
From this page, you need to copy the ” connection strict – primary key”. This will allow the device to comminucate. Then it can be copied and pasted.
Simulated Device - Node.js
As mentioned earlier, the dependency needs to be installed. Here we’ll see how the dependency is used to stream data. Our data, in this case, will be a JSON string containing the following parameters.
DeviceID and Data
“Device id” is the one that’s created and “Data” just values varying between 1 to 100.
'use strict';

var clientFromConnectionString = require('azure-iot-device-mqtt').clientFromConnectionString;
var Message = require('azure-iot-device').Message;

function azcall()
{
	var connectionString = 'YOUR CONNECTION STRING';

	var client = clientFromConnectionString(connectionString);
	function printResultFor(op)
	{
		return function printResult(err, res)
		{
			if (err) console.log(op + ' error: ' + err.toString());
			if (res) console.log(op + ' status: ' + res.constructor.name);
		};
	}

	var connectCallback = function (err)
	{
		if (err)
		{
			console.log('Could not connect: ' + err);
		}
		else
		{
			console.log('Client connected');
			pubData();
			function pubData()
			{
				var rand= Math.floor((Math.random() * 100) + 1);
				var data = JSON.stringify({ "device_id": "Simulated Device", "Data":rand});
				var message = new Message(data);
				console.log("Sending message: " + message.getData());
				client.sendEvent(message, printResultFor('send'));
			}
		}
	};
	client.open(connectCallback);
}
setInterval(azcall, 1500);
In the code above, we have used the function azcall() for streaming the messages after every 1.5 seconds. It’s a simple implementation of the azure IoT hub SDK which uses MQTT protocol internally. In the function pubData(), we’re publishing the data to the Azure IoT hub which is a JSON string.
The code is based on the sample provided by the Microsoft team.
https://github.com/Azure-Samples/azure-iot-samples-node
Before executing the code, we have one small step involved. We must check out the incoming messages to the Azure IoT Hub.
There’s a utility by Microsoft known as Device explorer twin. That allows us to monitor the messages. It’s a Windows C# app and can be downloaded from the below Github link.
https://github.com/Azure/azure-iot-sdk-csharp/releases/download/2018-3-13/SetupDeviceExplorer.msi
In order to use this, we need the connection string of the IoT Hub, not the Device. So head back to the Azure portal, and click on Shared access policies.

Fig 6: Shared access policies.
Click on shared access policies to open the policies panel. Here we are interested in “iothubowner”. Click on it to open the policy details.
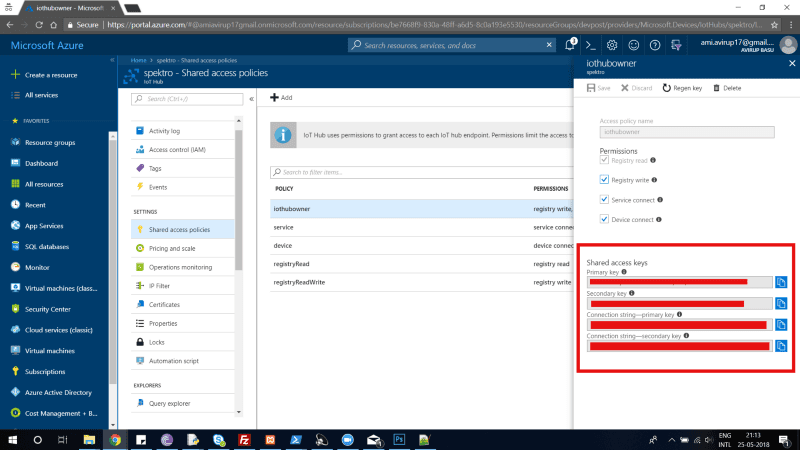
Fig7: IoT Hub – Connection String Primary Key
Copy the “Connection string–primary Key”
Now, fire up your device explorer tool and paste the connection string in the IoT Hub Connection string input panel.
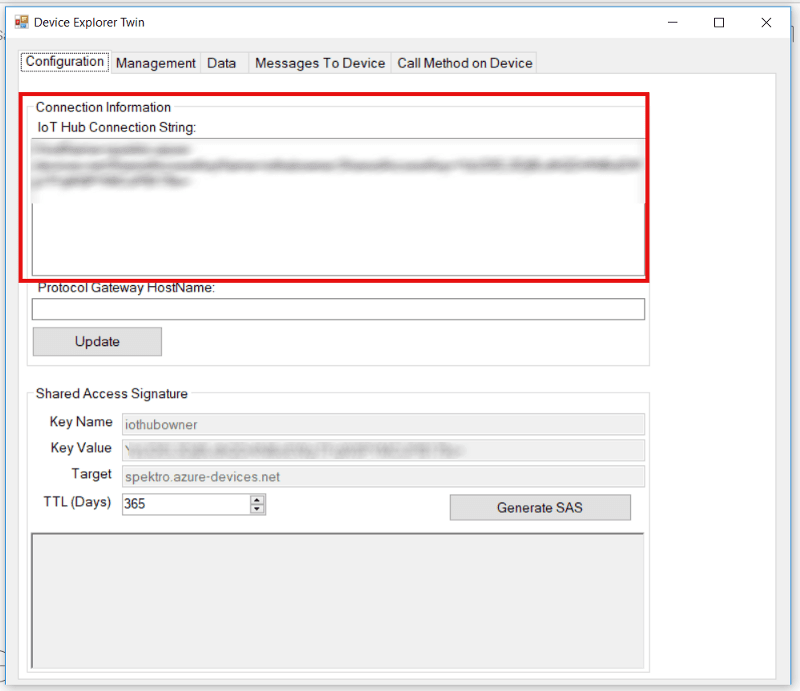
Fig 8: IoT Hub device utility
Then, click on update. After the update is successfully finished, click on Data.
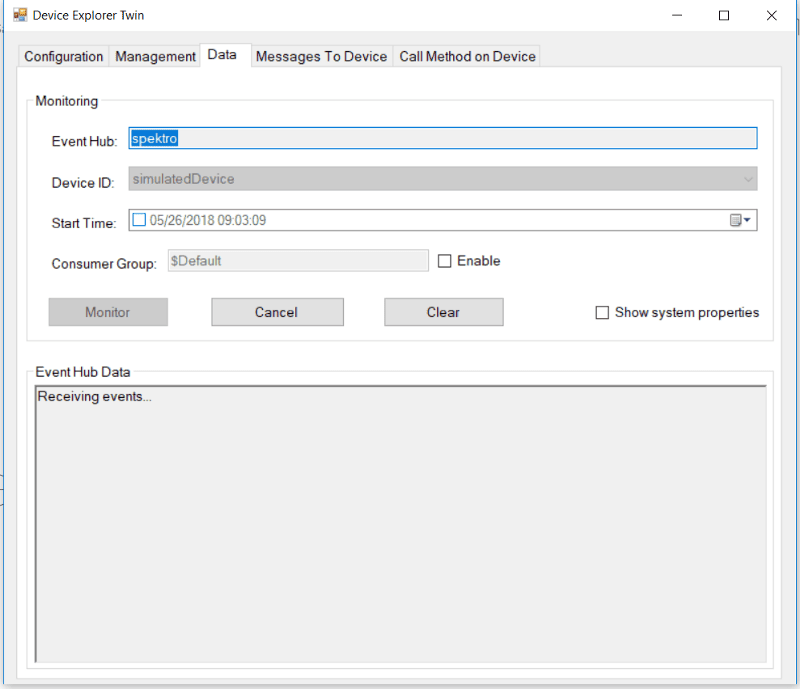
Fig 9: Monitoring messages
In this section, the device that you created from the portal before should appear on the Device ID drop-down. Select your device and click on the monitor.
Now, head back to the folder, where your node.js code was written and execute the code using any IDE. Or in this case, we used Windows Powershell.

Fig 10: Powershell window
At the same time, maximize the device explorer tool and then we’ll see the incoming messages as shown. Fig 11.

Fig 11: Incoming message stream to the IoT Hub
If everything is done correctly, the messages should appear here, which means that messages are being received by the IoT Hub. Now that we can send messages to the IoT Hub, we can write a server-less API for routing these messages to the Cosmos DB using Mongo DB API. Initially, we’ll set up the cosmos DB such that we know where exactly we need to route the data.
Azure Cosmos DB
Click below for a detailed description of Cosmos DB. Understood correctly, it’s a very informative write-up!
https://docs.microsoft.com/en-us/azure/cosmos-db/introduction
Create a Cosmos DB from the Azure portal as a new resource and select MongoDB under API drop-down.
Fig 12: Cosmos DB
After your deployment is completed, head on to the DB you created. In our case for reference, the name of the DB is “spektrodb”. This Cosmos DB is based on documents and it’s unstructured DB. Therefore, we can create new documents on the run-time. We just need to create a database for now under the name of “database_spektro”.

Fig 13: MongoDB database create.
For now, we’ll leave it in this way and just copy the connection string as it will be required in our Azure function. Head on to the DB you just created and click on quickstart.
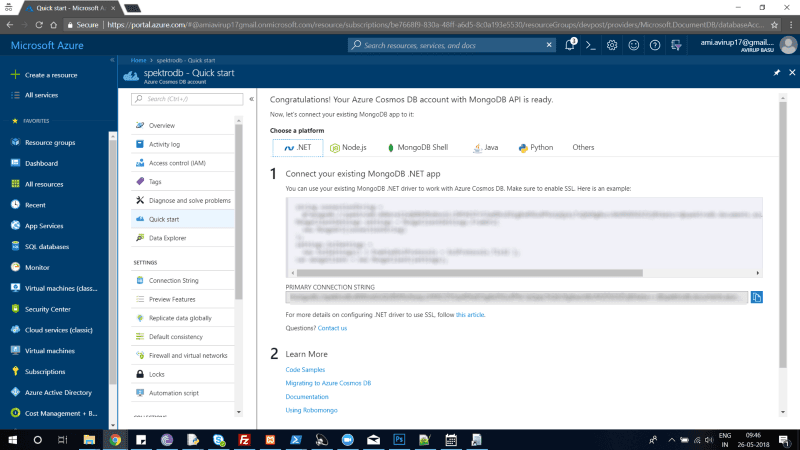
Fig 14: Cosmos DB
Keep the above data primarily to the connection string under .NET section somewhere saved locally. You may also want to have a look at the code as it’s going to be used in the Azure functions.
Azure functions
It’s like a micro-service that gets going whenever there is any triggers or requests. Here, we are interested to trigger an azure function whenever there is an incoming message in the Azure IoT Hub.
Before that, let’s create an azure function first. Head towards the Azure portal and search for azure function. In this case, the name of the function is “spektrofunc”.

Fig 15: Azure function
Click on a new function.
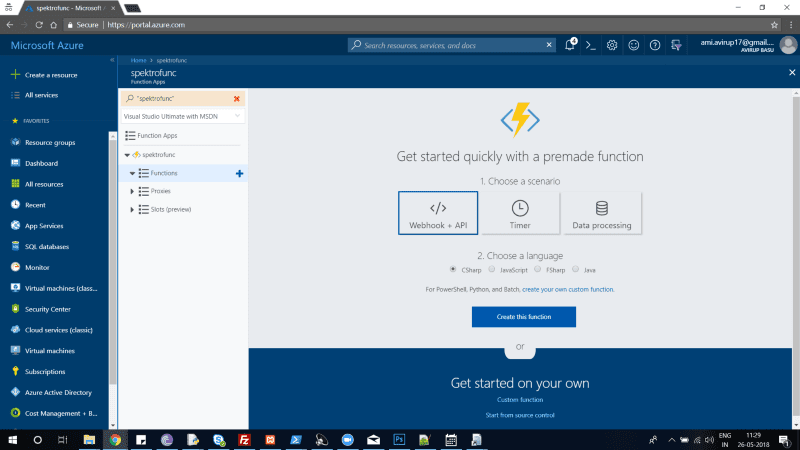
Fig 16: Azure function -1
Next, click on the custom function and navigate to “IoT Hub (Event Hub)”.

Fig 17: Azure function -2
After that, a configuration window will open where we will configure our IoT Hub named “spektro”. You can name your function anything. We named it as “spectroIotTrigger”. Under the event hub connection, click on new.

Explore More Relevant Articles on P360
- How Pharma AI Benefits the Time to Market for New Drugs
- 3 Things Pharma Companies Should Know About Territory Alignment
- 5 Use Cases for Commercial Pharma AI Beyond Drug Discovery
- 6 Important Pharma Data Collection Sources To Keep An Eye On
- How to Streamline Your Clinical Trial Management with Cloud Technology
Fig 18: Azure function -3
Here, click on IoT hub and the name of the IoT hub should appear.
Fig 19: Azure function -4
Click on select and finally on create.
Now, your function is ready for you to write code in C#.
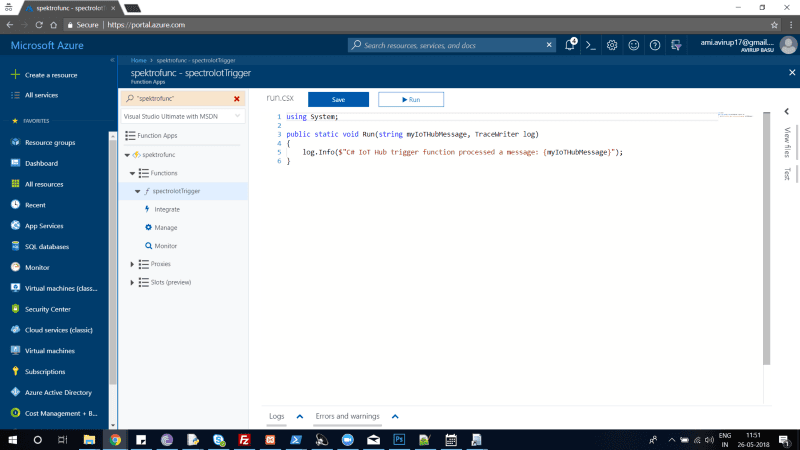
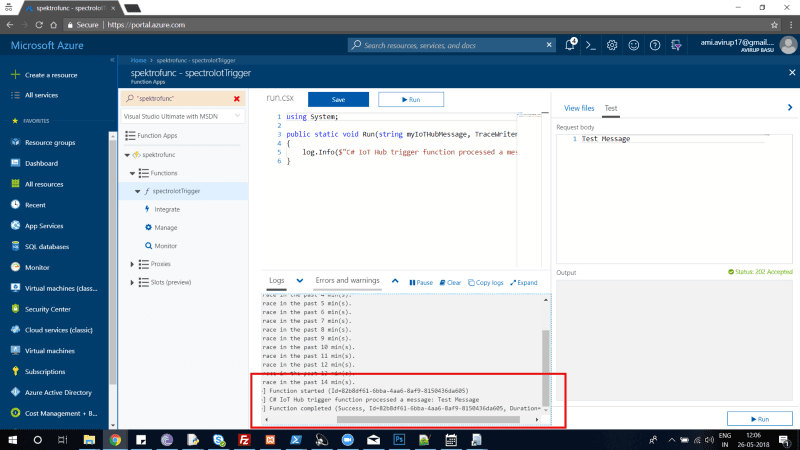
Fig 20: Azure function -5
Before writing the code, let’s find out how the already provided sample will work. In order to test the sample code provided, we need to click on test and logs, which is a place where the messages or errors are displayed.

Click on run and the test message should be displayed.
Fig 21: Azure function -6
We can also test with our device simulator in node.js. Just execute the code in the back-end, and the messages will be shown in the log window.
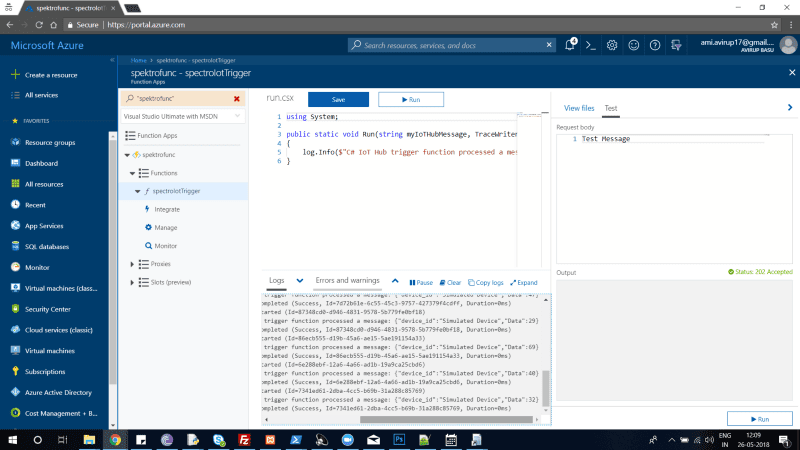
Fig 22: Azure function -7
Now, we can see the incoming messages in the azure function. The next task is to handle these incoming messages which will be used to publish data to cosmos DB.
Cosmos DB integration in Azure function
Before jumping off to integrate cosmos, we must include the dependencies. Adding dependencies in azure functions is a bit tricky. Click on “View files” just above the “Test” button. Then, we need to add one file named “Project.json”.
In the file, we need to manually declare the dependencies. For cosmos DB with MongoDB API, we need MongoDB driver. For handling JSON, we need Newtonsoft.json. You can also declare the .net version.
Let’s declare them using the following JSON.
{
  "frameworks": {
    "net46":{
      "dependencies": {
        "Newtonsoft.Json": "10.0.3",
        "System.ServiceModel.Primitives":"4.4.0",
        "MongoDB.Bson": "2.4.0",
        "MongoDB.Driver": "2.4.0",
        "MongoDB.Driver.Core": "2.4.0"
      }
    }
   }
}
Now, click on save and then browse to run.csx file.
Include all the necessary “using statements”.
using System;
using System.Runtime.Serialization;
using System.ServiceModel.Description;
using MongoDB.Bson.IO;
using MongoDB.Bson; using MongoDB; using MongoDB.Driver; using System.Security.Authentication; using System.Text; using Newtonsoft.Json;
Now, save it and run the file. If there isn’t any compilation error, then dependencies have been successfully installed.
Let’s write the code for decoding and pushing data. Our target is to create a new document named after the device ID. Then the document will contain the required parameter ID and parameter values.
In this case, it will be displayed as shown: {“Data”:”12″}
using System;
using System.Runtime.Serialization;
using System.ServiceModel.Description;
using MongoDB.Bson.IO;
using MongoDB.Bson;
using MongoDB;
using MongoDB.Driver;
using System.Security.Authentication;
using System.Text;
using Newtonsoft.Json;public static void Run(string myIoTHubMessage, TraceWriter log)
{
    log.Info($"C# IoT Hub trigger function processed a message: {myIoTHubMessage}");
    string deviceId="",data="";
    var raw_obj=JObject.Parse(myIoTHubMessage);
    deviceId=(string)raw_obj["device_id"];
    data=(string)raw_obj["Data"];
    Cosmos cosmos= new Cosmos(deviceId,data);
    cosmos.pushData();
}

//CosmosDB class
public class Cosmos
{
    string deviceId="",data="";
    public BsonDocument document = new BsonDocument();
    public Cosmos(string deviceId, string data)
    {
        this.deviceId=deviceId;
        this.data=data;
    }
    public void pushData()
    {
        MainAsync().Wait();
    }
    public async Task MainAsync()
    {
        string connectionString =
    @"";
    MongoClientSettings settings = MongoClientSettings.FromUrl(new MongoUrl(connectionString));
        settings.SslSettings = new SslSettings() { EnabledSslProtocols = SslProtocols.Tls12};
        var mongoClient = new MongoClient(settings);
        IMongoDatabase db = mongoClient.GetDatabase("database_spektro");
        var icollection = db.GetCollection(deviceId);
        document.Add("Data",data);
        await icollection.InsertOneAsync(document);
    }
}
The code above is the azure function written in C#. It decodes the JSON received in the string message from the azure IoT hub. A class was created to handle the MongoDB message push.
We pass the parameters through a parameter constructor and by an async call. Then, we push the data to the CosmosDB using MongoDB API. There are two options for testing the code. You can create any name for the DB.
Recall the “Test” area where there was some sample message.

Fig 23: Azure function screenshot for testing
In the test area, you can replace it with a JSON and click on run. This should execute the code with the sample input. Run a test for any errors.
Now, let’s check this with the simulated device code we have written earlier in node.js. Head on to the local folder and start the node.js code. Once it starts executing, go to your CosmosDB and click on “Data Explorer”.

Fig 24: Cosmos DB – Data Explorer
Click on the database that was created and then on the table name which is basically the device ID. Our device ID was a simulated device as in the node.js code. After we click on documents, the JSON files appear. Click on anyone and you can check out the data.
Conclusion
We have seen how we can simulate an IoT device using node.js and send messages to the IoT hub. Finally, we route the messages into respective tables in CosmosDB based on the device ID and stream data. This has a lot of use case(s).
Let’s take an example of telematics data from a car or any machine to be sent to the DB after a certain time interval. From some kind of remote weather station or any IoT use cases where data is involved.
Now that you know the flow of data, why not comment some use case(s) which perfectly fits in this flow? The part that we didn’t cover is the use of rule engines which can be programmed in the azure function. Another topic for another article!
Curious about how Azure can impact your business? Get in touch with us today for a free consultation below on how the various Azure platforms can help you grow your business.